Your Client Was Not Authoerized to Make a Login Request Please Try Again Later Archeage
Django Tutorial Part 8: User hallmark and permissions
In this tutorial, we'll show you how to permit users to log in to your site with their own accounts, and how to control what they can practice and see based on whether or non they are logged in and their permissions. As part of this demonstration, we'll extend the LocalLibrary website, adding login and logout pages, and user- and staff-specific pages for viewing books that have been borrowed.
Overview
Django provides an hallmark and dominance ("permission") system, built on height of the session framework discussed in the previous tutorial, that allows you to verify user credentials and define what actions each user is allowed to perform. The framework includes congenital-in models for Users and Groups (a generic way of applying permissions to more than one user at a fourth dimension), permissions/flags that designate whether a user may perform a job, forms and views for logging in users, and view tools for restricting content.
Note: According to Django the authentication organisation aims to be very generic, and so does non provide some features provided in other spider web authentication systems. Solutions for some common issues are available as third-party packages. For example, throttling of login attempts and hallmark against third parties (e.chiliad. OAuth).
In this tutorial, we'll bear witness you how to enable user authentication in the LocalLibrary website, create your own login and logout pages, add permissions to your models, and control access to pages. We'll use the authentication/permissions to brandish lists of books that have been borrowed for both users and librarians.
The hallmark system is very flexible, and you can build upwards your URLs, forms, views, and templates from scratch if you like, only calling the provided API to log in the user. However, in this commodity, we're going to employ Django's "stock" authentication views and forms for our login and logout pages. We'll withal need to create some templates, but that's pretty easy.
We'll also show you how to create permissions, and cheque on login condition and permissions in both views and templates.
Enabling authentication
The authentication was enabled automatically when we created the skeleton website (in tutorial two) so yous don't need to exercise anything more at this signal.
Notation: The necessary configuration was all done for united states when we created the app using the django-admin startproject command. The database tables for users and model permissions were created when we first called python manage.py migrate.
The configuration is gear up in the INSTALLED_APPS and MIDDLEWARE sections of the projection file (locallibrary/locallibrary/settings.py), as shown beneath:
INSTALLED_APPS = [ . . . 'django.contrib.auth' , #Core authentication framework and its default models. 'django.contrib.contenttypes' , #Django content type system (allows permissions to be associated with models). . . . . MIDDLEWARE = [ . . . 'django.contrib.sessions.middleware.SessionMiddleware' , #Manages sessions across requests . . . 'django.contrib.auth.middleware.AuthenticationMiddleware' , #Assembly users with requests using sessions. . . . . Creating users and groups
Y'all already created your kickoff user when we looked at the Django admin site in tutorial four (this was a superuser, created with the command python manage.py createsuperuser). Our superuser is already authenticated and has all permissions, so nosotros'll demand to create a test user to stand for a normal site user. We'll be using the admin site to create our locallibrary groups and website logins, as information technology is one of the quickest ways to do so.
Note: You can also create users programmatically, every bit shown below. You would have to do this, for example, if developing an interface to permit "ordinary" users to create their own logins (you shouldn't give most users access to the admin site).
from django.contrib.auth.models import User # Create user and save to the database user = User.objects.create_user( 'myusername' , 'myemail@crazymail.com' , 'mypassword' ) # Update fields and and so save again user.first_name = 'John' user.last_name = 'Citizen' user.relieve( ) It is highly recommended to prepare upwards a custom user model when starting an actual project. You lot'll exist able to easily customize information technology in the future if the demand arises. For more than information, run into Using a custom user model when starting a project (Django docs).
Below we'll first create a grouping and and so a user. Fifty-fifty though nosotros don't take any permissions to add for our library members yet, if we need to later, information technology will be much easier to add them in one case to the grouping than individually to each member.
Start the development server and navigate to the admin site in your local web browser (http://127.0.0.1:8000/admin/). Login to the site using the credentials for your superuser account. The top level of the Admin site displays all of your models, sorted by "Django application". From the Authentication and Dominance section, you can click the Users or Groups links to encounter their existing records.
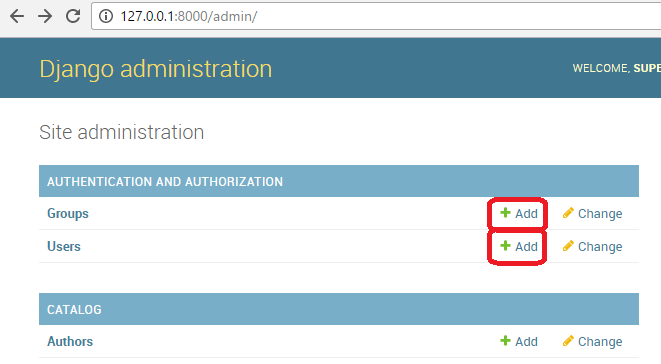
Commencement lets create a new group for our library members.
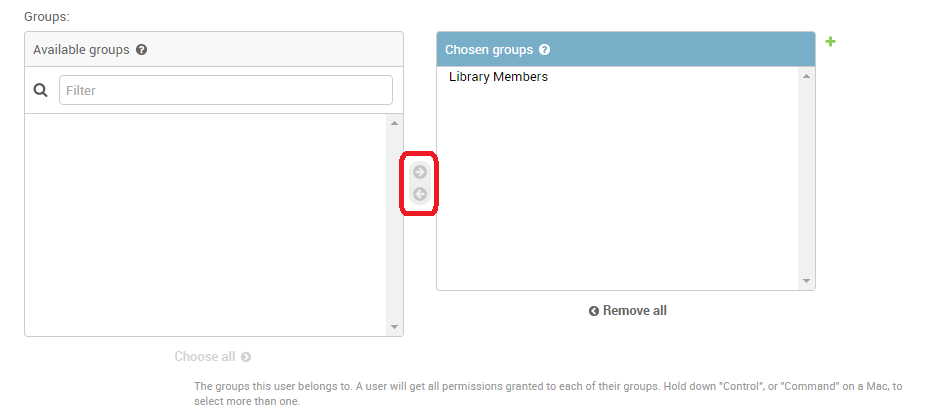
- Click the Add button (next to Group) to create a new Grouping; enter the Name "Library Members" for the group.
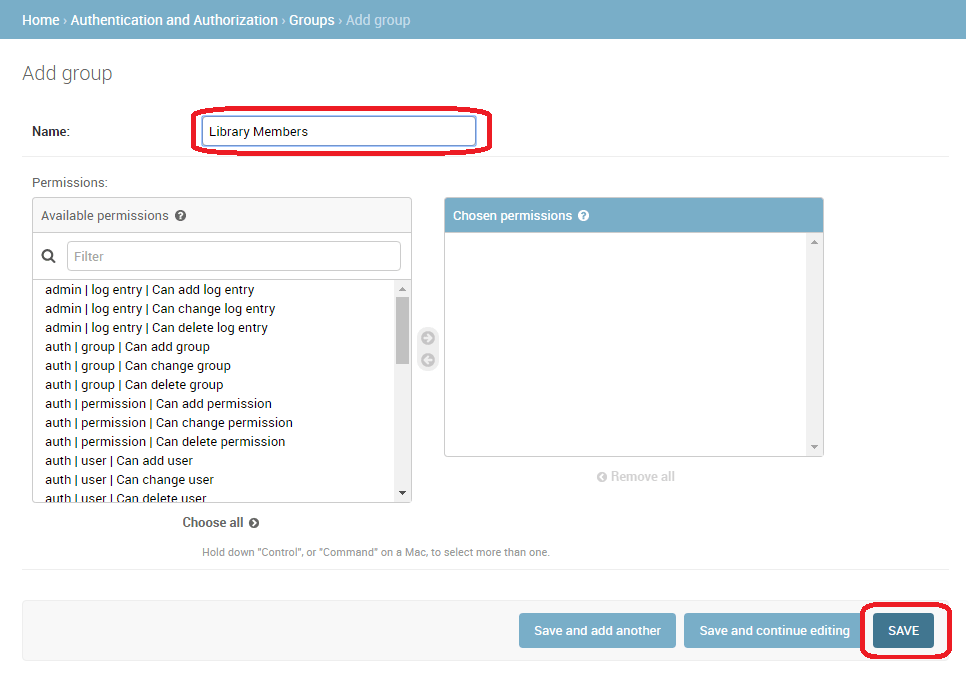
- Nosotros don't need any permissions for the group, and then merely press Salve (you will be taken to a list of groups).
Now let'southward create a user:
- Navigate dorsum to the home page of the admin site
- Click the Add push next to Users to open the Add user dialog box.
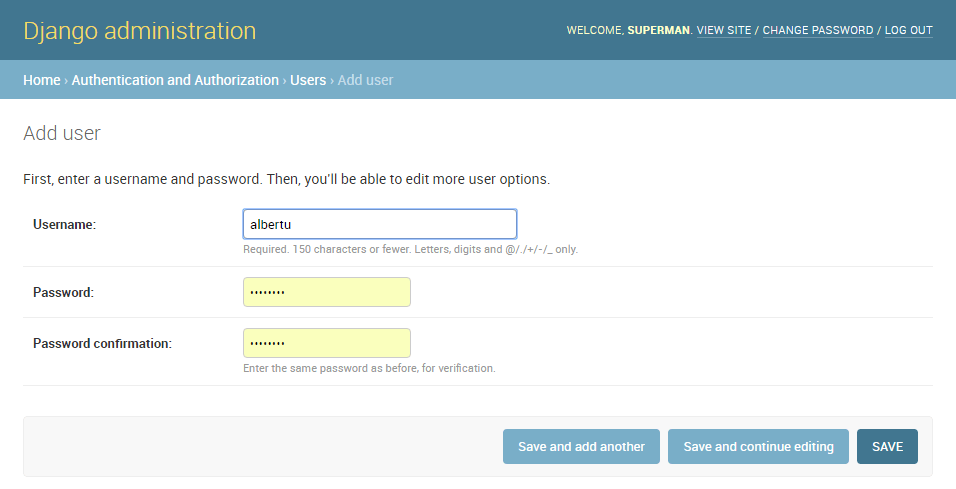
- Enter an appropriate Username and Countersign/Countersign confirmation for your test user
- Press SAVE to create the user. The admin site volition create the new user and immediately take you to a Change user screen where you can alter your username and add information for the User model's optional fields. These fields include the outset name, last name, email address, and the user's status and permissions (only the Active flag should be set). Further down you tin can specify the user'southward groups and permissions, and run across important dates related to the user (e.g. their join engagement and terminal login date).
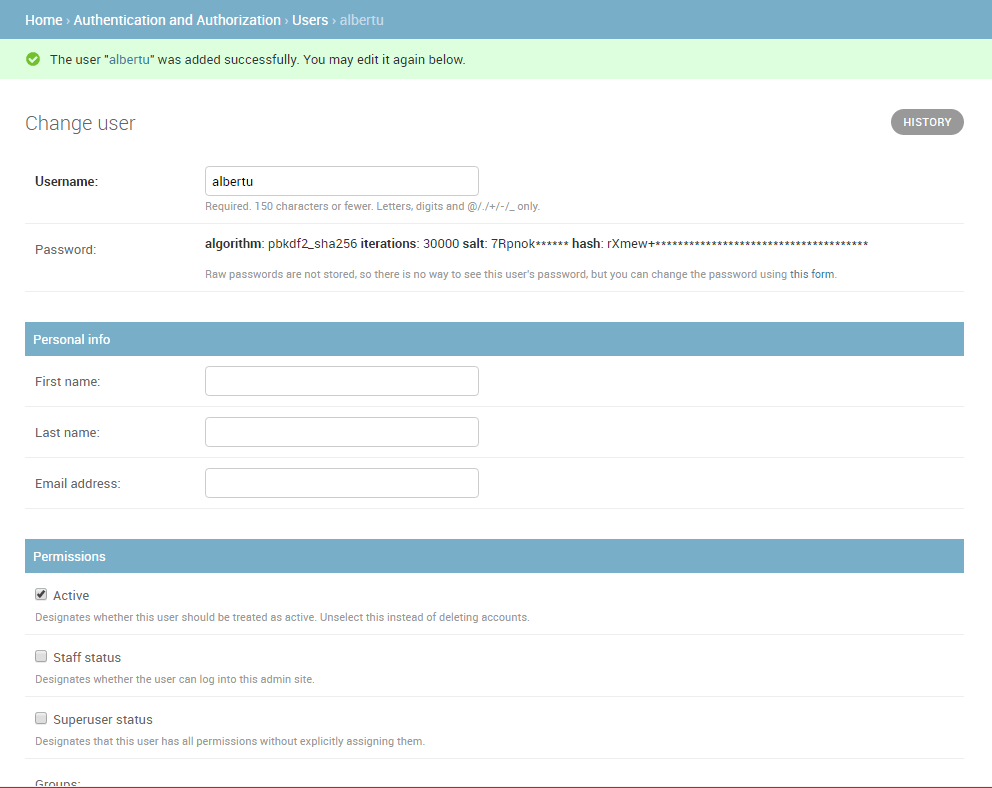
- In the Groups department, select Library Member group from the listing of Available groups, and and so press the right-arrow betwixt the boxes to move it into the Chosen groups box.
- We don't need to practise anything else hither, so but select Relieve once again, to become to the list of users.
That's it! Now you have a "normal library member" account that you lot will be able to use for testing (in one case we've implemented the pages to enable them to log in).
Note: Yous should try creating another library member user. Also, create a group for Librarians, and add a user to that likewise!
Setting upward your authentication views
Django provides almost everything you need to create authentication pages to handle login, log out, and countersign management "out of the box". This includes a URL mapper, views and forms, simply information technology does not include the templates — nosotros have to create our own!
In this section, we show how to integrate the default arrangement into the LocalLibrary website and create the templates. Nosotros'll put them in the main project URLs.
Notation: Y'all don't accept to use any of this code, just information technology is probable that you'll want to because it makes things a lot easier. Y'all'll almost certainly need to change the class handling code if you change your user model (an advanced topic!) but even so, you would all the same be able to use the stock view functions.
Note: In this case, we could reasonably put the authentication pages, including the URLs and templates, within our catalog application. Notwithstanding, if we had multiple applications it would exist amend to separate out this shared login behavior and have it bachelor across the whole site, so that is what we've shown hither!
Project URLs
Add the following to the bottom of the project urls.py file (locallibrary/locallibrary/urls.py) file:
#Add together Django site authentication urls (for login, logout, password direction) urlpatterns += [ path( 'accounts/' , include( 'django.contrib.auth.urls' ) ) , ] Navigate to the http://127.0.0.1:8000/accounts/ URL (note the abaft forward slash!). Django will show an error that it could not find this URL, and list all the URLs it tried. From this you can see the URLs that will piece of work, for example:
Note: Using the above method adds the following URLs with names in square brackets, which tin can exist used to reverse the URL mappings. Y'all don't have to implement anything else — the in a higher place URL mapping automatically maps the below mentioned URLs.
accounts/ login/ [name= 'login' ] accounts/ logout/ [proper name= 'logout' ] accounts/ password_change/ [name= 'password_change' ] accounts/ password_change/done/ [proper noun= 'password_change_done' ] accounts/ password_reset/ [name= 'password_reset' ] accounts/ password_reset/done/ [name= 'password_reset_done' ] accounts/ reset/ <uidb64> / <token> / [name= 'password_reset_confirm' ] accounts/ reset/done/ [proper noun= 'password_reset_complete' ] Now try to navigate to the login URL (http://127.0.0.ane:8000/accounts/login/). This will fail again, only with an error that tells you that we're missing the required template (registration/login.html) on the template search path. You'll see the following lines listed in the yellow section at the acme:
Exception Type: TemplateDoesNotExist Exception Value: registration/login.html The next step is to create a registration directory on the search path and and then add the login.html file.
Template directory
The URLs (and implicitly, views) that nosotros but added expect to find their associated templates in a directory /registration/ somewhere in the templates search path.
For this site, we'll put our HTML pages in the templates/registration/ directory. This directory should be in your projection root directory, i.e the same directory as the itemize and locallibrary folders. Delight create these folders at present.
Note: Your folder structure should at present await like the beneath:
locallibrary/ #Django project folder catalog/ locallibrary/ templates/ registration/
To make the templates directory visible to the template loader nosotros demand to add it in the template search path. Open the project settings (/locallibrary/locallibrary/settings.py).
So import the os module (add the post-obit line near the top of the file).
import os # needed by code below Update the TEMPLATES section's 'DIRS' line as shown:
. . . TEMPLATES = [ { . . . 'DIRS' : [bone.path.join(BASE_DIR, 'templates' ) ] , 'APP_DIRS' : True , . . . Login template
Alert: The authentication templates provided in this article are a very basic/slightly modified version of the Django demonstration login templates. You may demand to customize them for your own utilise!
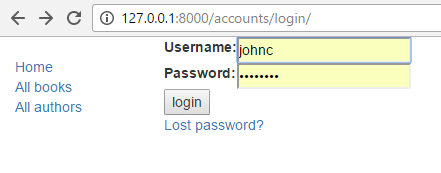
Create a new HTML file called /locallibrary/templates/registration/login.html and give it the following contents:
{% extends "base_generic.html" %} {% block content %} {% if form.errors %} <p > Your username and password didn't match. Please try once again. </p > {% endif %} {% if next %} {% if user.is_authenticated %} <p > Your account doesn't take access to this page. To go on, please login with an account that has access. </p > {% else %} <p > Delight login to see this page. </p > {% endif %} {% endif %} <form method = "post" activity = "{% url 'login' %}" > {% csrf_token %} <table > <tr > <td > {{ course.username.label_tag }} </td > <td > {{ form.username }} </td > </tr > <tr > <td > {{ form.password.label_tag }} </td > <td > {{ form.password }} </td > </tr > </tabular array > <input type = "submit" value = "login" /> <input type = "subconscious" name = "next" value = "{{ next }}" /> </form > {# Assumes you setup the password_reset view in your URLconf #} <p > <a href = "{% url 'password_reset' %}" > Lost password? </a > </p > {% endblock %} This template shares some similarities with the ones we've seen earlier — it extends our base template and overrides the content block. The rest of the code is fairly standard class treatment code, which we will talk over in a later tutorial. All yous need to know for now is that this will display a form in which you tin can enter your username and countersign, and that if you enter invalid values you will exist prompted to enter correct values when the page refreshes.
Navigate back to the login folio (http://127.0.0.1:8000/accounts/login/) once y'all've saved your template, and you should see something like this:
If you lot log in using valid credentials, you'll exist redirected to another page (by default this volition be http://127.0.0.1:8000/accounts/contour/). The problem is that, by default, Django expects that upon logging in yous will want to exist taken to a profile page, which may or may not be the case. As you oasis't defined this page yet, yous'll get some other fault!
Open the project settings (/locallibrary/locallibrary/settings.py) and add the text below to the bottom. Now when yous log in yous should be redirected to the site homepage by default.
# Redirect to domicile URL after login (Default redirects to /accounts/profile/) LOGIN_REDIRECT_URL = '/' Logout template
If you navigate to the logout URL (http://127.0.0.1:8000/accounts/logout/) then you'll come across some odd behavior — your user volition be logged out sure enough, but you lot'll be taken to the Admin logout page. That's not what you want, if only because the login link on that page takes you to the Admin login screen (and that is but available to users who have the is_staff permission).
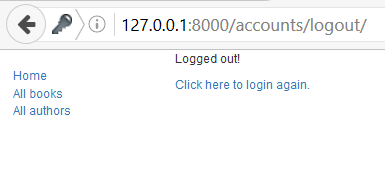
Create and open /locallibrary/templates/registration/logged_out.html. Copy in the text below:
{% extends "base_generic.html" %} {% block content %} <p > Logged out! </p > <a href = "{% url 'login'%}" > Click here to login once more. </a > {% endblock %} This template is very simple. It just displays a message informing you that you have been logged out, and provides a link that you can printing to become back to the login screen. If you become to the logout URL once again y'all should come across this page:
Countersign reset templates
The default password reset system uses email to send the user a reset link. You need to create forms to become the user's e-mail address, send the electronic mail, allow them to enter a new password, and to note when the whole process is consummate.
The following templates can be used as a starting point.
Password reset course
This is the grade used to get the user's email address (for sending the password reset e-mail). Create /locallibrary/templates/registration/password_reset_form.html, and give it the following contents:
{% extends "base_generic.html" %} {% block content %} <form action = " " method = "post" > {% csrf_token %} {% if form.email.errors %} {{ form.electronic mail.errors }} {% endif %} <p > {{ class.email }} </p > <input blazon = "submit" form = "btn btn-default btn-lg" value = "Reset password" > </form > {% endblock %} Password reset washed
This form is displayed afterward your email address has been collected. Create /locallibrary/templates/registration/password_reset_done.html, and give it the following contents:
{% extends "base_generic.html" %} {% block content %} <p > We've emailed you lot instructions for setting your password. If they haven't arrived in a few minutes, bank check your spam binder. </p > {% endblock %} Password reset e-mail
This template provides the text of the HTML e-mail containing the reset link that we volition send to users. Create /locallibrary/templates/registration/password_reset_email.html, and give it the following contents:
Someone asked for password reset for email {{ e-mail }}. Follow the link below: {{ protocol}}://{{ domain }}{% url 'password_reset_confirm' uidb64=uid token=token %} Password reset ostend
This page is where you enter your new password after clicking the link in the password reset email. Create /locallibrary/templates/registration/password_reset_confirm.html, and requite information technology the following contents:
{% extends "base_generic.html" %} {% block content %} {% if validlink %} <p > Please enter (and ostend) your new password. </p > <form activity = " " method = "post" > {% csrf_token %} <tabular array > <tr > <td > {{ form.new_password1.errors }} <label for = "id_new_password1" > New password: </characterization > </td > <td > {{ form.new_password1 }} </td > </tr > <tr > <td > {{ class.new_password2.errors }} <characterization for = "id_new_password2" > Confirm password: </characterization > </td > <td > {{ class.new_password2 }} </td > </tr > <tr > <td > </td > <td > <input type = "submit" value = "Change my password" /> </td > </tr > </table > </form > {% else %} <h1 > Countersign reset failed </h1 > <p > The countersign reset link was invalid, mayhap considering it has already been used. Please asking a new password reset. </p > {% endif %} {% endblock %} Password reset complete
This is the last countersign-reset template, which is displayed to notify you when the countersign reset has succeeded. Create /locallibrary/templates/registration/password_reset_complete.html, and give it the following contents:
{% extends "base_generic.html" %} {% block content %} <h1 > The password has been changed! </h1 > <p > <a href = "{% url 'login' %}" > log in again? </a > </p > {% endblock %} Testing the new hallmark pages
Now that you've added the URL configuration and created all these templates, the hallmark pages should now just piece of work!
You can test the new authentication pages past attempting to log in to and then log out of your superuser account using these URLs:
-
http://127.0.0.1:8000/accounts/login/ -
http://127.0.0.ane:8000/accounts/logout/
You'll exist able to test the password reset functionality from the link in the login page. Be enlightened that Django will simply send reset emails to addresses (users) that are already stored in its database!
Annotation: The password reset system requires that your website supports email, which is across the scope of this article, so this office won't work still. To allow testing, put the post-obit line at the finish of your settings.py file. This logs whatsoever emails sent to the console (so you can re-create the password reset link from the console).
EMAIL_BACKEND = 'django.core.postal service.backends.console.EmailBackend' For more information, encounter Sending e-mail (Django docs).
Testing against authenticated users
This department looks at what we can do to selectively command content the user sees based on whether they are logged in or not.
Testing in templates
Yous can go information near the currently logged in user in templates with the {{ user }} template variable (this is added to the template context by default when you fix up the project equally we did in our skeleton).
Typically you volition first test against the {{ user.is_authenticated }} template variable to decide whether the user is eligible to meet specific content. To demonstrate this, next we'll update our sidebar to brandish a "Login" link if the user is logged out, and a "Logout" link if they are logged in.
Open the base template (/locallibrary/itemize/templates/base_generic.html) and copy the following text into the sidebar cake, immediately before the endblock template tag.
<ul class = "sidebar-nav" > ... {% if user.is_authenticated %} <li > User: {{ user.get_username }} </li > <li > <a href = "{% url 'logout'%}?next={{request.path}}" > Logout </a > </li > {% else %} <li > <a href = "{% url 'login'%}?next={{request.path}}" > Login </a > </li > {% endif %} </ul > Every bit you can see, nosotros use if-else-endif template tags to conditionally display text based on whether {{ user.is_authenticated }} is true. If the user is authenticated then we know that we have a valid user, then we call {{ user.get_username }} to brandish their proper name.
We create the login and logout link URLs using the url template tag and the names of the respective URL configurations. Annotation also how we have appended ?next={{asking.path}} to the end of the URLs. What this does is add together a URL parameter side by side containing the address (URL) of the electric current page, to the stop of the linked URL. Later on the user has successfully logged in/out, the views will employ this "next" value to redirect the user back to the page where they first clicked the login/logout link.
Note: Try it out! If yous're on the home folio and yous click Login/Logout in the sidebar, then after the performance completes yous should cease up back on the aforementioned page.
Testing in views
If you lot're using function-based views, the easiest mode to restrict access to your functions is to apply the login_required decorator to your view function, as shown below. If the user is logged in then your view code will execute as normal. If the user is not logged in, this will redirect to the login URL defined in the project settings (settings.LOGIN_URL), passing the current absolute path equally the next URL parameter. If the user succeeds in logging in and then they volition exist returned back to this page, but this time authenticated.
from django.contrib.auth.decorators import login_required @login_required def my_view (request) : . . . Note: Yous can practice the same sort of thing manually by testing on asking.user.is_authenticated, but the decorator is much more convenient!
Similarly, the easiest way to restrict access to logged-in users in your grade-based views is to derive from LoginRequiredMixin. You lot need to declare this mixin beginning in the superclass list, earlier the main view form.
from django.contrib.auth.mixins import LoginRequiredMixin class MyView (LoginRequiredMixin, View) : . . . This has exactly the same redirect beliefs as the login_required decorator. You tin as well specify an alternative location to redirect the user to if they are not authenticated (login_url), and a URL parameter proper noun instead of "next" to insert the electric current absolute path (redirect_field_name).
class MyView (LoginRequiredMixin, View) : login_url = '/login/' redirect_field_name = 'redirect_to' For additional detail, bank check out the Django docs here.
Case — listing the electric current user's books
Now that we know how to restrict a folio to a item user, let's create a view of the books that the electric current user has borrowed.
Unfortunately, we don't notwithstanding have any fashion for users to infringe books! And so before we can create the book list we'll beginning extend the BookInstance model to support the concept of borrowing and apply the Django Admin application to loan a number of books to our test user.
Models
Showtime, we're going to have to make it possible for users to take a BookInstance on loan (we already have a condition and a due_back engagement, but we don't yet have any association between this model and a User. Nosotros'll create 1 using a ForeignKey (i-to-many) field. Nosotros also need an easy mechanism to test whether a loaned book is overdue.
Open catalog/models.py, and import the User model from django.contrib.auth.models (add together this just below the previous import line at the height of the file, so User is available to subsequent code that makes use of it):
from django.contrib.auth.models import User Adjacent, add together the borrower field to the BookInstance model:
borrower = models.ForeignKey(User, on_delete=models.SET_NULL, null= Truthful , blank= True ) While we're here, allow's add together a property that nosotros can phone call from our templates to tell if a item volume instance is overdue. While we could calculate this in the template itself, using a property as shown beneath will be much more efficient.
Add this somewhere nigh the height of the file:
from datetime import date At present add the following property definition to the BookInstance form:
@property def is_overdue (self) : if self.due_back and date.today( ) > self.due_back: return True return Imitation Note: We beginning verify whether due_back is empty earlier making a comparison. An empty due_back field would cause Django to throw an error instead of showing the page: empty values are not comparable. This is not something we would want our users to experience!
Now that we've updated our models, we'll need to brand fresh migrations on the project then apply those migrations:
python3 manage.py makemigrations python3 manage.py drift Admin
At present open catalog/admin.py, and add the borrower field to the BookInstanceAdmin form in both the list_display and the fieldsets as shown below. This volition make the field visible in the Admin department, assuasive us to assign a User to a BookInstance when needed.
@admin.annals (BookInstance) class BookInstanceAdmin (admin.ModelAdmin) : list_display = ( 'book' , 'status' , 'borrower' , 'due_back' , 'id' ) list_filter = ( 'status' , 'due_back' ) fieldsets = ( ( None , { 'fields' : ( 'book' , 'banner' , 'id' ) } ) , ( 'Availability' , { 'fields' : ( 'status' , 'due_back' , 'borrower' ) } ) , ) Loan a few books
Now that it's possible to loan books to a specific user, go and loan out a number of BookInstance records. Set their borrowed field to your test user, make the status "On loan", and set due dates both in the future and the past.
Annotation: Nosotros won't spell the process out, equally y'all already know how to use the Admin site!
On loan view
Now we'll add a view for getting the listing of all books that have been loaned to the electric current user. We'll apply the same generic form-based list view nosotros're familiar with, but this time we'll also import and derive from LoginRequiredMixin, so that only a logged in user can call this view. Nosotros will also cull to declare a template_name, rather than using the default, because we may end upwards having a few dissimilar lists of BookInstance records, with different views and templates.
Add the following to catalog/views.py:
from django.contrib.auth.mixins import LoginRequiredMixin class LoanedBooksByUserListView (LoginRequiredMixin,generic.ListView) : """Generic grade-based view listing books on loan to current user.""" model = BookInstance template_name = 'itemize/bookinstance_list_borrowed_user.html' paginate_by = ten def get_queryset (cocky) : return BookInstance.objects. filter (borrower=self.request.user) . filter (status__exact= 'o' ) .order_by( 'due_back' ) In order to restrict our query to just the BookInstance objects for the current user, we re-implement get_queryset() as shown above. Note that "o" is the stored code for "on loan" and we order by the due_back date then that the oldest items are displayed first.
URL conf for on loan books
Now open up /itemize/urls.py and add a path() pointing to the above view (you can just copy the text beneath to the end of the file).
urlpatterns += [ path( 'mybooks/' , views.LoanedBooksByUserListView.as_view( ) , name= 'my-borrowed' ) , ] Template for on-loan books
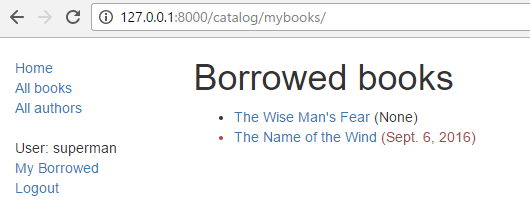
Now, all we demand to practice for this page is add a template. First, create the template file /catalog/templates/itemize/bookinstance_list_borrowed_user.html and requite it the following contents:
{ % extends "base_generic.html" % } { % block content % } <h1>Borrowed books< /h1> { % if bookinstance_list % } <ul> { % for bookinst in bookinstance_list % } <li class = "{% if bookinst.is_overdue %}text-danger{% endif %}" > <a href= "{% url 'book-particular' bookinst.book.pk %}" > { {bookinst.book.championship} } < /a> ( { { bookinst.due_back } } ) < /li> { % endfor % } < /ul> { % else % } <p>In that location are no books borrowed. < /p> { % endif % } { % endblock % } This template is very similar to those nosotros've created previously for the Book and Writer objects. The only "new" matter here is that we check the method we added in the model (bookinst.is_overdue) and employ information technology to change the color of overdue items.
When the development server is running, you lot should now be able to view the list for a logged in user in your browser at http://127.0.0.1:8000/catalog/mybooks/. Try this out with your user logged in and logged out (in the second case, y'all should be redirected to the login page).
The very last step is to add a link for this new page into the sidebar. We'll put this in the same department where we display other data for the logged in user.
Open up the base template (/locallibrary/itemize/templates/base_generic.html) and add the "My Borrowed" line to the sidebar in the position shown beneath.
<ul class = "sidebar-nav" > { % if user.is_authenticated % } <li>User: { { user.get_username } } < /li> <li> <a href= "{% url 'my-borrowed' %}" >My Borrowed< /a> < /li> <li> <a href= "{% url 'logout'%}?next={{request.path}}" >Logout< /a> < /li> { % else % } <li> <a href= "{% url 'login'%}?next={{request.path}}" >Login< /a> < /li> { % endif % } < /ul> What does information technology look like?
When any user is logged in, they'll run into the My Borrowed link in the sidebar, and the listing of books displayed as beneath (the first book has no due date, which is a bug nosotros hope to fix in a later tutorial!).
Permissions
Permissions are associated with models and define the operations that can exist performed on a model instance by a user who has the permission. By default, Django automatically gives add, alter, and delete permissions to all models, which allow users with the permissions to perform the associated actions via the admin site. You can ascertain your ain permissions to models and grant them to specific users. Y'all tin can too modify the permissions associated with different instances of the same model.
Testing on permissions in views and templates is and then very like to testing on the authentication status (and in fact, testing for a permission also tests for authentication).
Models
Defining permissions is done on the model "form Meta" section, using the permissions field. You can specify as many permissions every bit you demand in a tuple, each permission itself being defined in a nested tuple containing the permission name and permission display value. For instance, we might ascertain a permission to allow a user to mark that a book has been returned as shown:
class BookInstance (models.Model) : . . . class Meta : . . . permissions = ( ( "can_mark_returned" , "Fix book as returned" ) , ) We could then assign the permission to a "Librarian" group in the Admin site.
Open the catalog/models.py, and add the permission as shown higher up. You lot will need to re-run your migrations (telephone call python3 manage.py makemigrations and python3 manage.py migrate) to update the database appropriately.
Templates
The current user's permissions are stored in a template variable called {{ perms }}. You can check whether the electric current user has a detail permission using the specific variable proper name inside the associated Django "app" — e.g. {{ perms.itemize.can_mark_returned }} will be True if the user has this permission, and Faux otherwise. We typically test for the permission using the template {% if %} tag as shown:
{ % if perms.catalog.can_mark_returned % } <!- - We can marking a BookInstance as returned. - - > <!- - Perhaps add lawmaking to link to a "volume render" view here. - - > { % endif % } Views
Permissions can exist tested in function view using the permission_required decorator or in a class-based view using the PermissionRequiredMixin. The blueprint are the same as for login hallmark, though of course, you might reasonably take to add multiple permissions.
Function view decorator:
from django.contrib.auth.decorators import permission_required @permission_required ( 'itemize.can_mark_returned' ) @permission_required ( 'catalog.can_edit' ) def my_view (request) : . . . A permission-required mixin for form-based views.
from django.contrib.auth.mixins import PermissionRequiredMixin class MyView (PermissionRequiredMixin, View) : permission_required = 'catalog.can_mark_returned' # Or multiple permissions permission_required = ( 'itemize.can_mark_returned' , 'catalog.can_edit' ) # Note that 'catalog.can_edit' is just an example # the itemize awarding doesn't take such permission! Note: There is a modest default difference in the beliefs to a higher place. By default for a logged-in user with a permission violation:
-
@permission_requiredredirects to login screen (HTTP Status 302). -
PermissionRequiredMixinreturns 403 (HTTP Status Forbidden).
Normally y'all will want the PermissionRequiredMixin beliefs: return 403 if a user is logged in but does not have the right permission. To exercise this for a function view use @login_required and @permission_required with raise_exception=True equally shown:
from django.contrib.auth.decorators import login_required, permission_required @login_required @permission_required ( 'catalog.can_mark_returned' , raise_exception= True ) def my_view (request) : . . . Example
We won't update the LocalLibrary hither; mayhap in the adjacent tutorial!
Challenge yourself
Earlier in this article, we showed you how to create a folio for the current user, listing the books that they have borrowed. The challenge now is to create a like page that is but visible for librarians, that displays all books that accept been borrowed, and which includes the name of each borrower.
Y'all should be able to follow the same pattern as for the other view. The chief difference is that you'll demand to restrict the view to just librarians. You could practice this based on whether the user is a staff member (function decorator: staff_member_required, template variable: user.is_staff) but we recommend that you instead employ the can_mark_returned permission and PermissionRequiredMixin, as described in the previous department.
Alert: Remember non to utilize your superuser for permissions based testing (permission checks always return true for superusers, even if a permission has non notwithstanding been defined!). Instead, create a librarian user, and add the required capability.
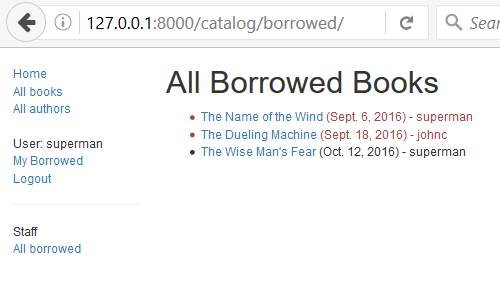
When y'all are finished, your page should look something like the screenshot beneath.
Summary
Excellent work — you've at present created a website where library members tin log in and view their own content, and where librarians (with the right permission) tin view all loaned books and their borrowers. At the moment we're still just viewing content, but the aforementioned principles and techniques are used when you want to starting time modifying and adding data.
In our side by side article, we'll look at how you tin use Django forms to collect user input, so start modifying some of our stored information.
Encounter too
In this module
Source: https://developer.mozilla.org/en-US/docs/Learn/Server-side/Django/Authentication
0 Response to "Your Client Was Not Authoerized to Make a Login Request Please Try Again Later Archeage"
Post a Comment